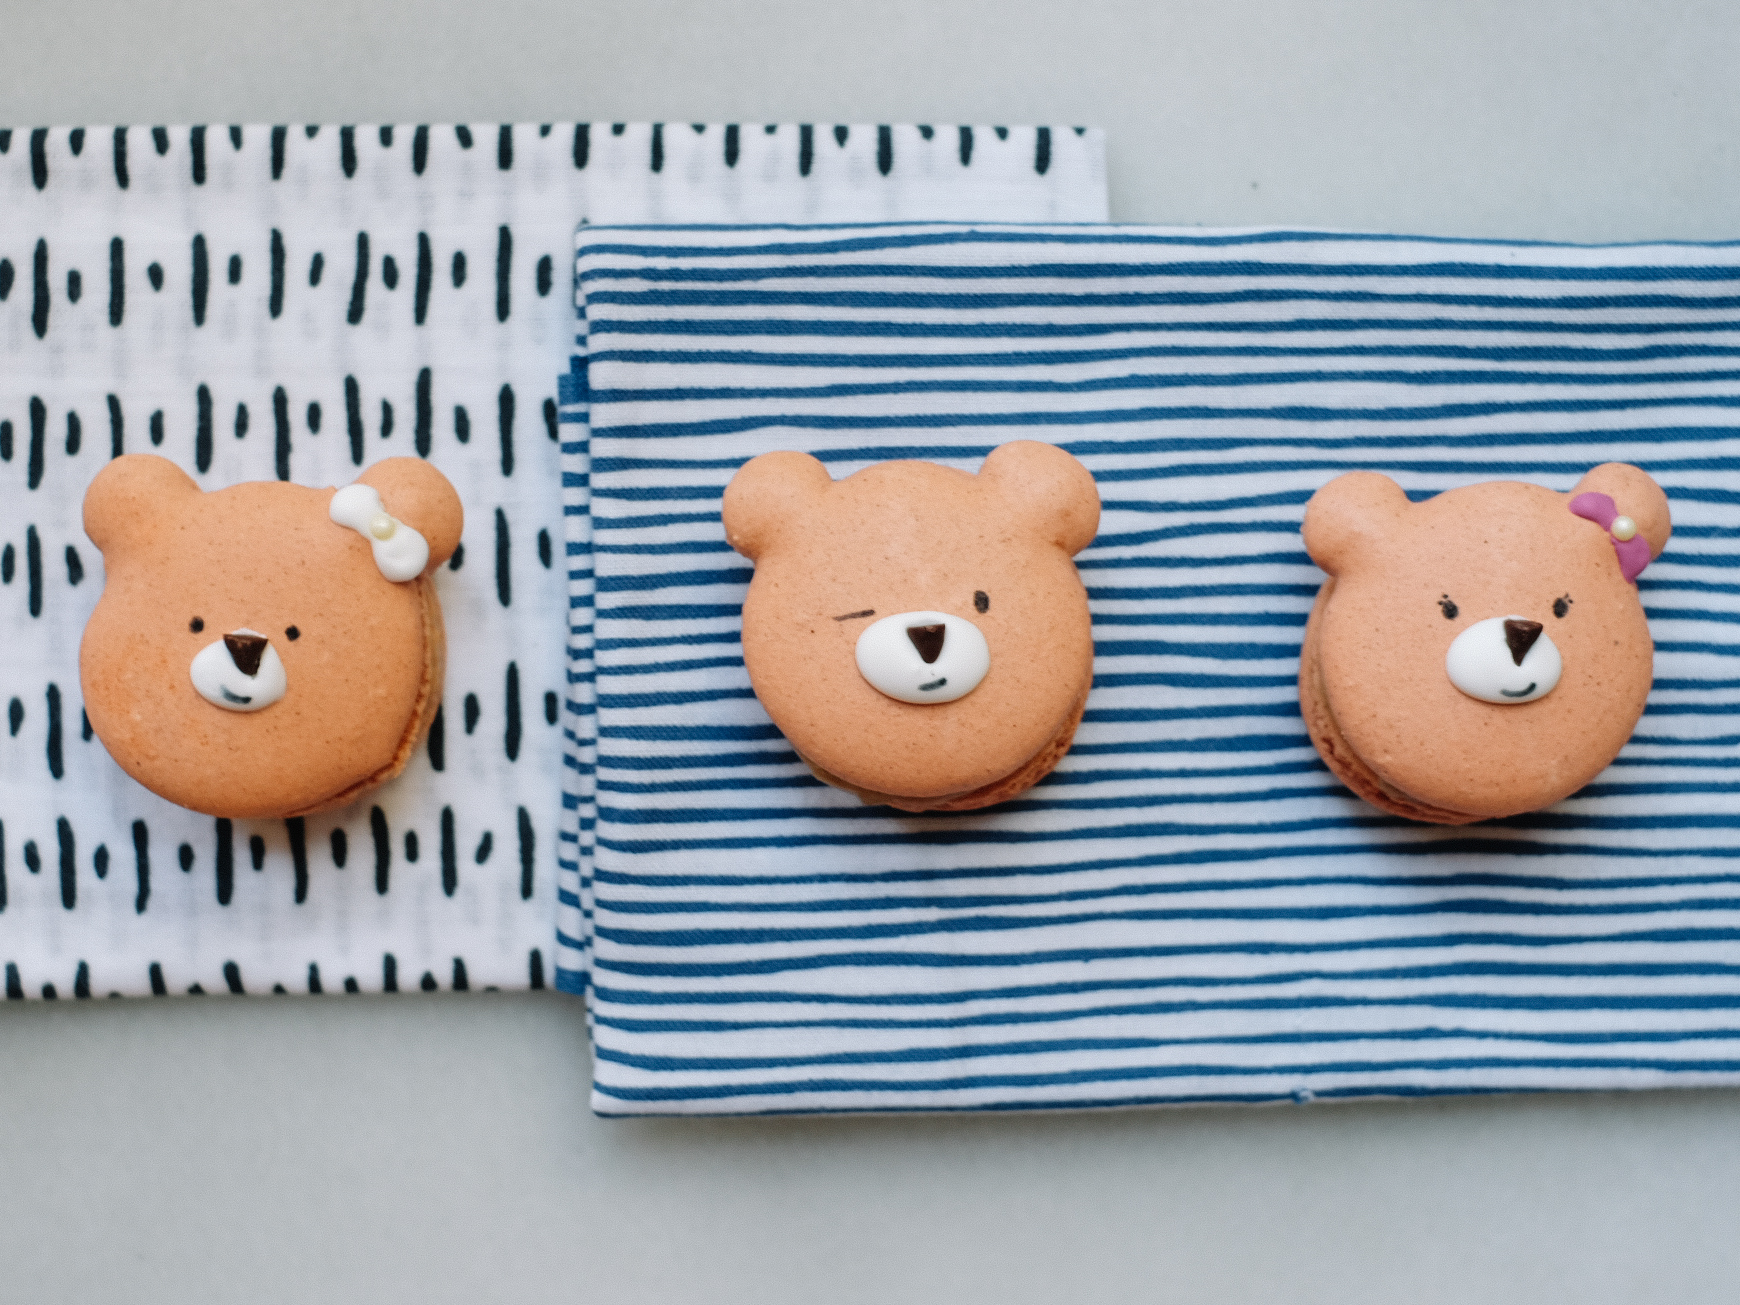
Gingerbread Bear Macarons
It's day eight of twelve days of cookies!! Have you been following along? If you have, thank you (*blush*), and I hope you're collecting some ideas/recipes/inspo for your cookie gifting/eating/making this year. And if you just tuned in, it's not too late to catch up and you still have four more new cookies to look forward to! I can't remember if I've shared this or not yet but I'm pretty sure, no I'm confident, I have the best mom in the world, for me, because I know I'm not the only one who thinks their mom is the best but I know for a fact that she is the best mom for me. Growing up, my mom worked full-time at a job and her daily roundtrip commute was around two hours. That's a long commute, considering we lived on an island that you could drive around in a day. And yet, despite her busy schedule, she still found time to pack me the best home lunches (complete with musubi bento boxes), make my class the most incredible snacks for holidays and birthdays, and spend every Christmas making whichever and however many Christmas cookies I wanted to make. We made sugar santas, pressed out spritz butter cookies, candy canes, you name it. We made it all. And then we drove around and dropped them off to friends and family. So starting my own twelve days of cookies tradition last year was actually the logical, natural progression. In fact, it doesn't actually feel like the holiday season until the kitchen is lit up with the glow of the oven (light because I'm always spying on my cookies), the whole house smells like sugar and butter, and the counters are exploding with containers filled with beautiful, colorful, sweet treats.
While the cookie making tradition was shared with my mom, I think I have to give the cookie eating tradition to my dad. There's nothing more exciting than watching someone happily devour the cookies you spent hours baking, decorating, and pouring your heart and soul into. And my dad was always good at making me feel like our cookies were the best ever. He usually leans toward the chocolate chip variety, which rarely made our list during the holiday season, but he was kind enough to reach for a handful of spritz cookies instead. Side note, did anyone else grow up making these? I was always in awe of how wonderfully perfect and uniform the cookies looked when they came out of that press. We made wreaths, stars, christmas trees, you name it, we made it and they were all tiny, beautiful, and fun and easy to make. I am thinking I need to get a press of my own for next year. Anyway, back to my dad. He was also a key component in the twelve day equation, because if he hadn't been there to enjoy all our cookies and make me feel like they were the best, ever, I'm pretty sure I wouldn't have enjoyed the process as much.


Today's cookie was made for and inspired by my lovely parents (ok, not the bear shape but everything else about them was). For the last decade or so, every May has been the time when my dad takes his yearly trip to France. And after almost every trip, he comes home with a beautiful box of my favorite french macarons from Ladurée. This year when we (my parents and I) met up in New York, we spent our first lunch at Laduree Soho and of course got a box of macarons to snack on while we walked around. My mom and I split the lot of them and decided that our favorite was the seasonal gingerbread flavor. I'm pretty sure my father had the pistachio or french vanilla and missed out on the gingerbread (sorry dad!). And since I've been obsessing over Ladurée's gingerbread macaron ever since October in NYC, I knew I had to add them to my cookie list this year. And making them into cute little bears makes them even better. Now, full disclosure, these don't taste like Ladurée's gingerbread macarons but they equally fantastic and absolutely taste like gingerbread! And if the sight of gingerbread bears hanging out getting festive doesn't brighten your day, then I don't know what will!


A few notes on the process because macarons have the reputation of being somewhat fussy and temperamental. I'm not going to pretend like they don't have their quirks but they are totally doable! You just need a little patience, a kitchen scale, a Thermapen or other candy thermometer, a pastry bag with a 1/2" round tip, and a pastry bag with a 3/8" round tip. Think science because you need to be very precise when making these. Do yourself a favor and measure everything out (mise en place) before you get started. It's going to be the key to your success because precision is a necessary component. I also strongly recommend weighing your almond flour, powdered sugarWhen piping your shells, make sure you pipe straight down (hold your bag perpendicular to your sheet), and start with your tip where you want your macaron to end. When you've piped your round to fill the template, simply release pressure and quickly swirl your tip away. Also, don't skip tapping the bottom of your pan. This gets all the air bubbles, which will help to ensure smoother shells and prevent cracking/exploding, as well as smooth out any peaks that have formed from piping. If any soft peaks remain on the tops of your shell after tapping the bottom of pan, simply smooth them out by dipping your fingertip and water and gently pressing them down. A final note is on the ears, I recommend piping one row of rounds then immediately piping the ears, this will give you more defined ears. Another way to go is the pipe the ears at the same time you pipe each round. This will yield ears that blend into the overall shape (you can see examples of both). One thing you should avoid doing is piping your whole sheet then adding your ears. This will most likely result in cracks at the ears. However, if this does happen, never fear, that's what bows are for ;) ;) !!

Gingerbread Bear Macarons
Slightly adapted from Thomas Keller & Sebastien Rouxel Artisan's Bouchon Bakery
Ganache slightly adapted from Alana Bread's White chocolate ginger ganache
Makes around 2 dozen sandwiched cookies
INGREDIENTS
GANACHE
3/4 c. + 1 1/2 Tbsp. (200g) white couverture chocolate, chopped
1/3 c. + 1 Tbsp (3.4 oz) heavy whipping cream
1 1/4 tsp cinnamon
1/8 tsp ground cloves
2 tsp ground ginger
1/4 tsp ground nutmeg
2 tsp crystallized ginger, finely chopped
SHELLS
- 1 3/4 c. + 2 1/2 Tbsp. (212 grams) fine almond flour/meal
- 1 3/4 c. + 1 Tbsp + 2 tsp. (212 grams) powdered sugar
- 1/4 c. + 1 1/2 Tbsp. (82 grams) egg whites
- 1/4 c. + 2 Tbsp. (90 grams) egg whites
- 1 c. + 3 Tbsp. (236 grams) granulate sugar, plus a pinch for the egg whites
- 2/3 c. (158 grams) water
- 2 tsp. ground cinnamon
- 2 tsp. ground ginger
- 1/2 tsp. ground nutmeg
- Gel or powder food coloring (I used a combo of brown and orange)
DECORATION
- Royal icing
- Mini chocolate chips
- Sprinkles
- Edible makers (black is a must)
- Gel or powder food coloring (I used fuchsia for the bows)
TOOLS
- Bear macaron template (print four copies on 8 1/2" x 11" paper, then tape two together, overlapping so there's even spacing, for two templates)
- Baking sheets
- Silpat mat or parchment paper
- Food processor
- Large mixing bowl
- Medium glass bowl
- Silicone spoonula
- Wooden spoon
- Whisk
- Small saucepan
- Measuring cups and spoons
- Glass measuring cup (for liquids)
- Kitchen scale
- Thermapen or candy thermometer
- Plastic wrap
- Pastry/piping bag
- 3/8" round piping tip
- 1/2" round piping tip
- Wire cooling racks
- Plastic wrap
FIX
GANACHE
Pour cream into glass bowl and heat in the microwave in 30 seconds increments or until relatively hot. Add chopped chocolate into cream bowl and stir continuously with silicone spoonula until chocolate has melted and mixture is combined. Add cinnamon, cloves, ginger, nutmeg, and crystallized ginger and stir to combine.
Cover bowl loosely with plastic wrap and transfer to cool and thicken, preferably overnight.
SHELLS
Line baking sheets with templates then line with silpat mats or parchment paper and set aside. Preheat the oven to 325°F.
If you almond flour/meal isn't super fine, place in food processor and pulse to grind it as fine as possible.
Sift almond flour, powdered sugar, cinnamon, nutmeg, and ginger into large mixing bowl, then whisk together. Mound almond flour mixture and make a 4" well in the center. Be sure to leave a layer of flour at the bottom. Pour in the 1/4 c. +1 1/2 Tbsp. (82 grams) egg whites and combine with silicone spatula. Add desired amount of food coloring to the mixture, stirring until evenly distributed. Note the color will dilute when you add your meringue mixture, so add a little more color than you think is necessary. Set aside.
Place remaining 1/4 c. + 2 Tbsp. (90 grams) egg whites in the bowl of stand mixer fitted with whisk attachment.
In small saucepan, combine 1 c. + 3 tablespoons (236 grams) granulated sugar and water in and heat over medium-high heat until the syrup reaches 203°F.
While syrup is continuing to cook, add a pinch of sugar to the egg whites and turn the mixer to medium speed, and whip into soft peaks. If the egg whites reach soft peaks before the syrup reaches 248°F, reduce speed to the lowest setting, in order to keep them moving without whipping further.
When syrup reaches 248°F, remove pan from the heat and turn mixer to medium-low speed. Slowly add syrup to egg white mixture, pouring it between the side of the bowl and the whisk. Your meringue will deflate, so don't worry if it happens. Increase speed to medium and whip for 5 minutes, or until the whites hold stiff, glossy peaks. The bowl may still be warm to the touch but the meringue should have cooled. If it hasn't, continue to whip until it is cool.
Using silicone spoonula or wooden spoon, fold one-third of the meringue into the almond mixture, then continue adding meringue a little at a time, until when you fold batter over on itself, the "ribbon" moves slowly. You don't want your mixture to be so stiff that it holds its shape without moving at all and yet you don't want it to be so loose that it dissolves into itself and does not maintain the ribbon. It's better for the mixture to be slightly too stiff than too loose. Also note, you may not use all of your meringue mixture--that's ok!
You have two options for piping. If you have two pastry bags, you can fit one with the 1/2" tip and the other with the 3/8" and distribute two-thirds of the mixture to the 1/2" bag and the remainder to the 3/8" bag. Use the 1/2" tip to pipe rounds, then switch to the 3/8" for the ears (pipe ears after piping rounds for that row--don't wait till you've piped all your rounds or you'll have cracked ears). If you only have one bag, it's best to pipe everything with the 3/8" tip. Pipe by holding the bag upright about 1/2" above the center of circle and pipe out enough mixture to fill in the circle. I recommend piping a row of rounds then a row of bears. To pipe the bear ears, first pipe that row of rounds, then add ears OR pipe one bear at a time. If you pipe the row of rounds and immediately pipe on the ears, you will have more defined ears. If you pipe each bear head individually, you will have less defined ears. When all rows on first sheet have been piped, tap the bottom of the pan to spread the batter evenly and smooth any peaks left by the bag.
For convection oven, bake for 8 or 10 minutes or until tops are shiny and crisp. For standard oven, bake for 9 to 12 minutes, until tops are shiny and crisp. Set pan on a cooling rack and cool completely.
Repeat steps 9 and 10 for the next sheet and repeat again until all the batter has been used.
When all shells have cooled completely, prepare (a clean) piping bag with a 3/8" tip and neatly pipe rounds of ganache onto round shells (not bear head side). To close, gently place its partner bear head shell on top of the ganache and twist shut, taking care to prevent ganache spilling over the edges.
To decorate, prepare a piping bag fitted with a 1/8" tip and fill with white royal icing. Pipe on mouths and add a mini chocolate chip for the nose. Pipe bows on any cracked ears (I colored these to be pink but you can leave them all white) and add a sprinkle in center of bow if desired . Let icing set completely then draw on faces and mouths!
Cover macarons and transfer to the refrigerator to maturate for at least 24 hours.
Let come to room temperature and serve and enjoy or package and gift! Please note that if packaging and gifting, keep macarons in refrigerator (or even freezer) until gifting.